Appendix A: Manufacturer Specifications and Instructions

Contents

Manufacturer

Valve Type

System Pressure psi

Agent Weight, lbs

Part Number

Valve Assembly Size, inches

Page Number in Appendix A

Ansul Halon 1301 System Containers

A-3

Ansul

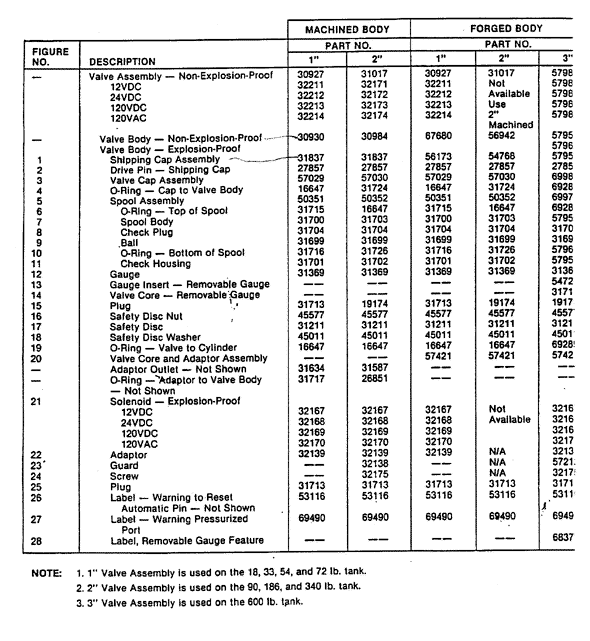
High Flow Valve

360

18, 33, 54, 72, 90

32602

1

A-7

Ansul

High Flow Valve

360

90, 186, 340,

32603

2

A-7

Ansul

High Flow Valve

360

600

57980

3

A-7

Ansul

High Flow Valve

360

600

76114 (replaces 57980)

3

A-7

Ansul

Pressure Differential Valve

360

18, 33, 54,72,90,1, 86

26850


A-11

Ansul

Cutter Type

360

18, 54, 72, 90,

16588


A-13

Ansul

US Navy Valves

600

10, 15, 60, 95, 125

77654N and others

1, 1.5

A-16

Chemetron

Alpha Series- Group 1

360


1-048-0720 V


A-24

Chemetron

Alpha Series-

360

9 to 15

1-048-0819 H


A-24

Chemetron

Alpha Series- Group 2

360


1-048-0721 V


A-24

Chemetron

Alpha Series-

360

16 to 26

1-048-0820 H


A-24

Chemetron

Alpha Series- Group 3

360


1-048-0722 V


A-24

Chemetron

Alpha Series-

360

27 to 36

1-048-0821 H


A-24

Chemetron

Beta Series- Group 1

360


1-048-0723 V


A-28

Chemetron

Beta Series

360

55 to 95

1-048-0822 H


A-28

Chemetron

Beta Series Group 2

360


1-048-0724 V


A-28

Chemetron

Beta Series

360

96 to 167

1-048-0823 H


A-28

Chemetron

Gamma Series-Group 1 (250SB)

360

153 to 268

1-048-0726


A-32

Chemetron

Gamma Series-Group 2 (400B)

360

237 to 415

1-048-0583


A-32

Chemetron

Gamma Series-Group 3 (550B)

360

314 to 550

1-048-0840


A-32

Chemetron

High Flow - 600

360


1-061-0720


A-36

Chemetron

Series 70

600


1-061-0730


A-52

Chemetron

High Flow-360

360


1-061-0934


A-65

Kidde-Fenwal Halon 1310 System Containers

A-82

Fenwal

Fill charge for HRD Sphere

360

8 to 201

06-116300-001


A-85

Fenwal

Spherical Modular Storage container


A-87

Fenwal

Cylinder Valve (Old style)

360


31-19203X-XXX


A-89

Kidde-Halon 1310 System Containers

A-94

Kidde

Series 487 Commercial Valves

360

10 to 125

486324

1.5

A-104

Kidde

Series 487 Commercial Valves

360

200 to 350

486363

2

A-104

Kidde

Series 487 Commercial Valves

360

600

486377

2.5

A-104

Kidde

Obsolete Commercial Valves

360

20, 40, 60, 125, 200, 312, 550

896150


A-106

Kidde

Military Application Valve

360


149743


A-110

Kidde

US Navy Valve (Old Style)

600

10, 15,60,95,125

486143


A-112

Kidde

US Navy Valve (Old Style)

600

10,15,60,95,125

898496


A-115

Kidde

US Navy Valve (Obsolete)

600

20, 40, 60, 95, 125

877653


A-120

Kidde

US Navy Valve (Obsolete)

600

20, 40, 60, 95, 125

840253


A-120

Fike

See Appendix


A-124

Ginge Kerr

See Appendix


A-137

Pyrotronics

Series H- 8

360

4 to 8


A-145

Pyrotronics

Series H- 15

360

9 to 15


A-145

Pyrotronics

Series H- 30

360

20 to 30


A-145

Pyrotronics

Series H- 60

360

35 to 60


A-145

Pyrotronics

Series H-125

360

65 to 125


A-145

Pyrotronics

Series H-250

360

130 to 250


A-145

Pyrotronics

Series H-350

360

255 to 350


A-145

Wormald Int.

Electric Valve Actuator

360, 600


303426


A-156

Wormald Int.

1" NGT

360, 600


302936


A-160

Wormald Int.

Multiple Stack Actuator

360, 600


303444


A-163

Wormald Int.

MK I, II, III, IV, V, and High Flow


A166


Return to Table of Contents

ANSUL FIRE PROTECTION
HALON 1301 SYSTEM CONTAINERS

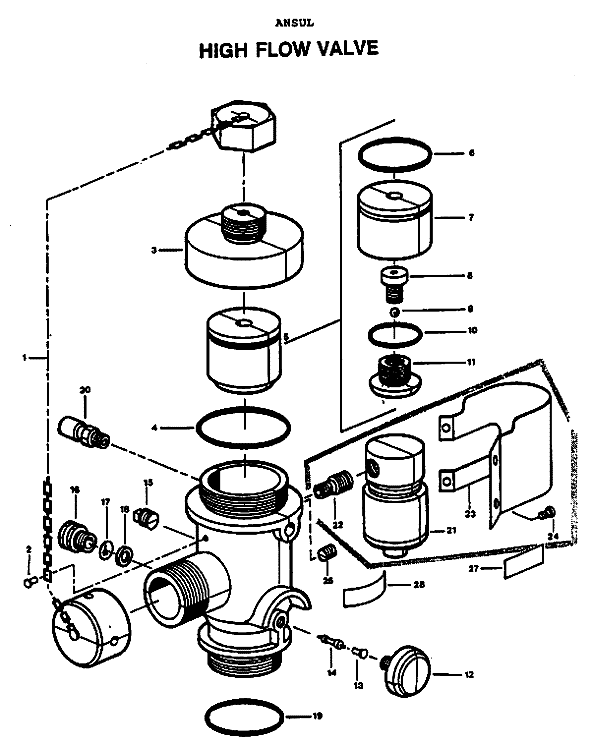
ANSUL HIGH FLOW VALVE OPERATING PROCEDURES

  1. Both the discharge port cap and the actuation port cap should be in place before moving or handling the cylinder or valve. The cylinder and valve combination should be properly secured at the work station so that the cylinder will not move if there is an accidental discharge. This is extremely important to avoid the possibility of serious injury.
  2. Remove the discharge port cap and securely attach the proper discharge fitting adapter with the reclaim hose assembly. Any hose assembly valve should be closed at this time.
  3. With the cylinder in the upright position initial discharge will be liquid product (Halon 1301) until the liquid level falls below the bottom of the siphon tube. Additional reclaiming will be vapor and, depending upon the type of reclaiming equipment being used, may require a switch over to a vapor recovery unit. Complete recovery is considered concluded when the reclaiming equipment vacuum gauge shows approximately twenty five (25) inches of vacuum.
  4. The valve is maintained in a closed position due to the force applied to the larger surface area on the top side of the spool as compared with the bottom side even though the initial pressure is equalized. If there is a small leak of top side pressure the check assembly inside of the spool will allow for minor adjustments by seepage, and still maintain equal pressure to keep the spool in a dosed position.
  5. To open the valve, top side pressure must be released by depressing the valve core located under the actuation port cap at the top of the cylinder. You will hear a small amount of gas being released followed by a rapid snap as the spool quickly rises to the open position. To start the flow of halon, the hose assembly valve should be opened.
  6. When the cylinder is empty, close the hose assembly valve and remove the discharge fitting adapter with the reclaim hose assembly.
  7. Cylinder should be pressurized with dry nitrogen to 100 to 150 psi through the outlet port. Top side pressure can then be applied with nitrogen to close the valve. This will prevent foreign matter from entering the valve and cylinder assembly. Keep moisture out of the cylinder and allow the valve to be opened later. Label cylinder as empty. This should be done if the cylinder will be reused.
  8. Replace the discharge port cap and the actuation port cap to prevent damage to the threads and lost caps.

(Reference Field Fill Station Operation Manual P/N 30627)
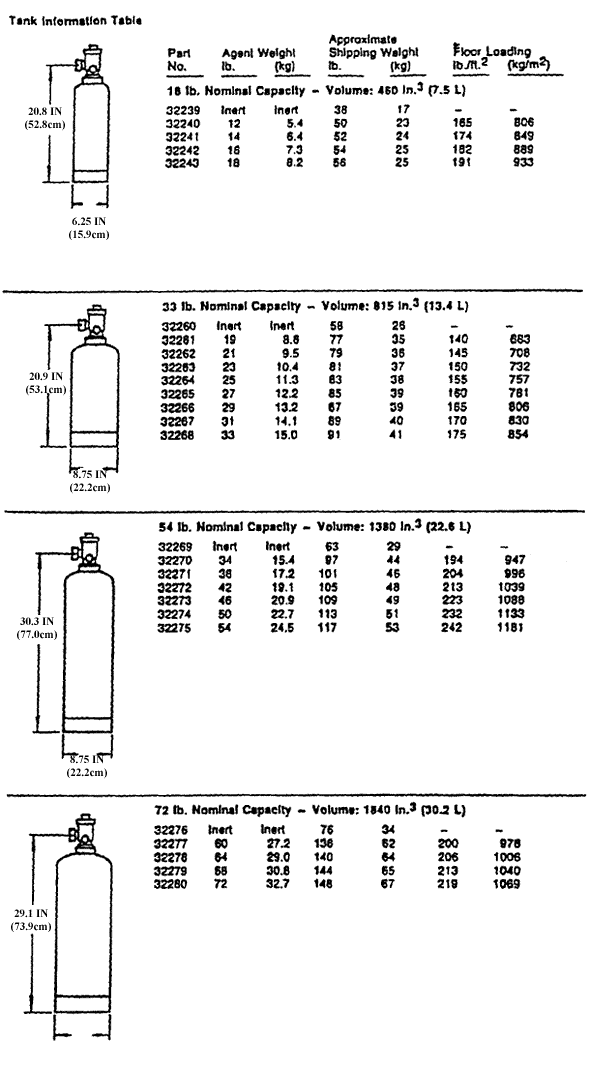
INERT TANK
SIZE
(LB.)

PART NUMBER

12 VDC

24 VDC

120 VDC

120 VDC

18
33
54
72
90
188
340

22627
22647
22683
22711
22731
22751
23290

22632
22656
22690
22716
22736
22766
23316

22637
22665
22697
22721
22741
22781
23342

22642
22674
22704
22726
22746
22796
23368

NOTE: For Part Numbers of variable filled tanks with explosion-proof electric actuation, refer to Page(s) 5 and 6 of
Installation Manual (Part No. 32850) of Data Sheet (Form No. F-77171).

ANSUL PRESSURE DIFFERENTIAL VALVE OPERATING PROCEDURES

  1. Both the discharge port plug and the actuation port plug should be in place before moving or handling the cylinder or valve. The cylinder and valve combination should be properly secured at the work station so that the cylinder will not move if there is an accidental discharge. This is extremely important to avoid the possibility of serious injury.
  2. Remove the discharge port plug and securely attach the proper discharge fitting adapter with the reclaim hose assembly. Any hose assembly valve should be closed at this time.
  3. With the cylinder in the upright position initial discharge will be liquid product (Halon 1301) until the liquid level falls below the bottom of the siphon tube. Additional reclaiming will be vapor and, depending upon the type of reclaiming equipment being used, may require a switch over to a vapor recovery unit. Complete recovery is considered concluded when the reclaiming equipment vacuum gauge shows approximately twenty-five (25) inches of vacuum.
  4. The valve is maintained in a closed position due to the force applied to the seal body by the internal cylinder pressure.
  5. To open the valve, top side pressure must be applied. Remove the actuation port plug. Securely attach a hose connected to a nitrogen cylinder and regulator assembly (with output of 800 psi). Slowly apply nitrogen pressure until the piston is pushed down releasing the seal and opening the valve.
  6. When the cylinder is empty close the hose assembly valve and remove the discharge fitting adapter with the reclaim hose assembly.
  7. Replace the discharge port cap and the actuation port cap to prevent damage to the threads and lost caps.

(Reference Field Fill Station Operation Manual P/N 30627)
Form No.F-77207

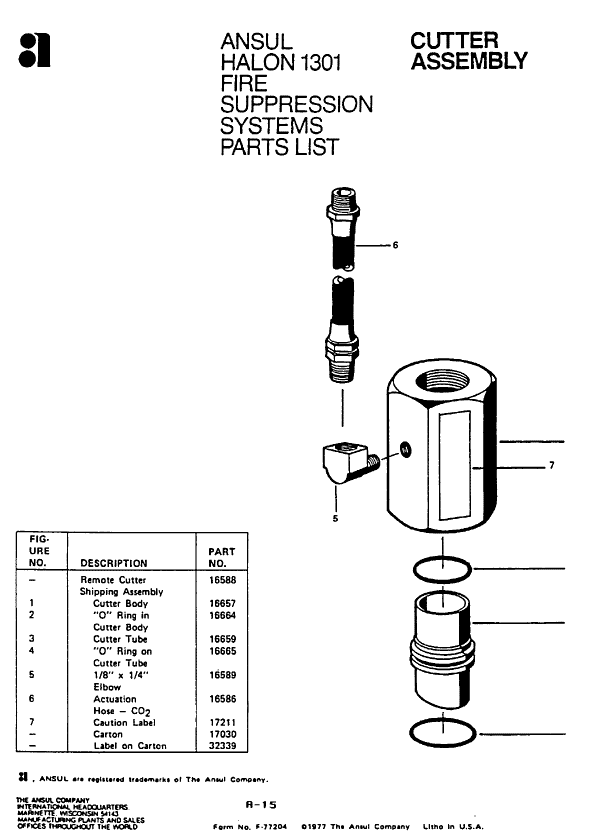
ANSUL CUTTER TYPE ASSEMBLY OPERATING PROCEDURES
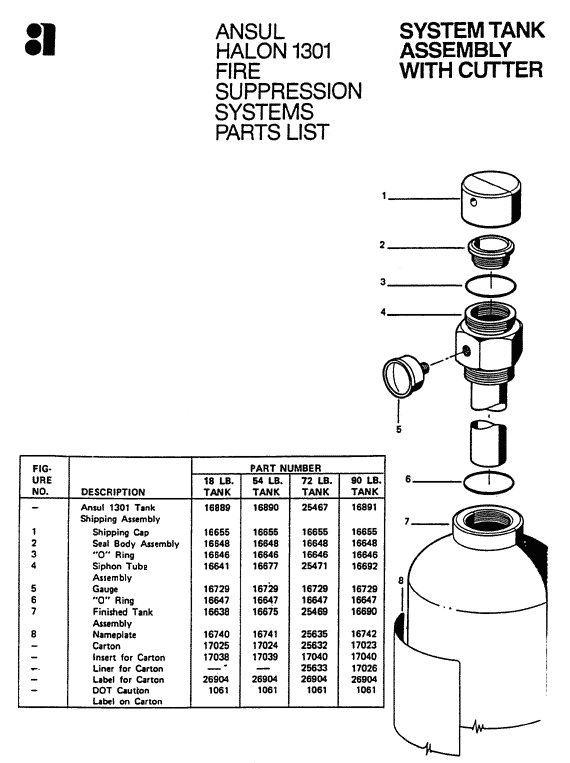
  1. When this type of cylinder is received, the cutter assembly should have been removed and a shipping cap should have been used. Properly secure the cylinder at the work station so the cylinder will not move it there is an accidental discharge.
    Caution: If the cutter assembly is attached, extreme caution should be used. The cutter tube could be in contact with the seal body assembly and could easily cut through if handled improperly or if the cutter body is rotated improperly. This is extremely important to avoid the possibility of serious injury.
  2. Caution: If the cutter assembly is attached, it must be carefully removed by turning it counter clockwise after the cylinder has been properly secured at the work station. The cutter tube should be removed from the cutter assembly. The cutter tube should be cleaned, lubricated, and returned to the cutter assembly so that it is completely in the raised position. If this is not done properly, the cutter could cut through the seal body assembly and cause an immediate discharge.
    If the shipping cap is in place remove it. Securely attach the cutter assembly to the tank assembly by turning it clockwise. Attach the proper discharge fitting adapter with the reclaim hose assembly. Any hose assembly valve should be closed at this time.
  3. With the cylinder in the upright position initial discharge will be liquid product (Halon 1301) until the liquid level falls below the bottom of the siphon tube. Additional reclaiming will be vapor and, depending upon the type of reclaiming equipment being used, may require a switch over to a vapor recovery unit. Complete recovery is considered concluded when the reclaiming equipment vacuum gauge shows approximately twenty-five (25) inches of vacuum.
  4. To open the valve, pressure must be applied to the elbow fitting on the side of the cutter assembly. Securely attach a hose connected to a nitrogen cylinder and regulator assembly (with output of 800 psi). Rapidly apply nitrogen pressure until the cutter tube is pushed down cutting the seal body assembly. To start the flow of halon, the hose assembly valve should be opened.
  5. When the cylinder is empty close the hose assembly valve and remove the discharge fitting adapter with the reclaim hose assembly.
  6. Replace the shipping cap if available.

Form No. F-77205

ANSUL/WORMALD - US NAVY VALVE OPERATING PROCEDURES

  1. Both the discharge port cap and the actuation port cap should be in place before moving or handling the cylinder or valve. The cylinder and valve combination should be properly secured at the work station so that the cylinder will not move if there is an accidental discharge. This is extremely important to avoid the possibility of serious injury.
  2. Remove the discharge port cap and securely attach the proper discharge fitting adapter with the reclaim hose assembly. Any hose assembly valve should be closed at this time.
  3. With the cylinder in the upright position initial discharge will be liquid product (Halon 1301) until the liquid level falls below the bottom of the siphon tube. Additional reclaiming will be vapor and, depending upon the type of reclaiming equipment being used, may require a switch over to a vapor recovery unit. Complete recovery is considered concluded when the reclaiming equipment vacuum gauge shows approximately twenty-five (25) inches of vacuum.
  4. The valve is maintained in a closed position due to the force applied to the larger surface area on the top side of the spool as compared with the bottom side even though the initial pressure is equalized. If there is a small leak of top side pressure the check assembly inside of the spool will allow for minor adjustments by seepage, and still maintain equal pressure to keep the spool in a closed position.
  5. To open the valve, top side pressure must be released by depressing the valve core located under the actuation port cap at the top of the cylinder. You will hear a small amount of gas being released followed by a rapid snap as the spool quickly rises to the open position. To start the flow of halon, the hose assembly valve should be opened.
  6. When the cylinder is empty close the hose assembly valve and remove the discharge fitting adapter with the reclaim hose assembly.
  7. Cylinder should be pressurized with dry nitrogen to 100 to 150 psi through the outlet port. Top side pressure can then be applied with nitrogen to close the valve. This will prevent foreign matter from entering the valve and cylinder assembly. Keep moisture out of the cylinder, and allow the valve to be opened later. Label cylinder as empty. This should be done if the cylinder will be reused.
  8. Replace the discharge port cap and the actuation port cap to prevent damage to the threads and lost caps. Replace shipping cap [NSN 5340-01-205-9936] before handling or storage.

NAVSEA 0993-LP-031-2010

Table 7-3 Parts List (continued)

Figure and
Index No.

Part Number

Description

Qty Per Assembly

7-3

27848N (03670)

VALVE, HALON, 1-1/2 IN.


-1

S27791 (03670)

  • CONNECTOR,7/16-20 UNF-3AMS33656

1

-2

S33677 (03670)

  • CAP

1

-3

S26711 (03670)

  • PACKING PREFORMED

1

-4

2367 (03670)

  • CHAIN, 10 LINKS

1

-5

S27857 (03670)

  • SCREW, DRIVE

2

-6

S33676 (03670)

  • CAP, OUTLET

1

Figure 7-3. 1-1/2-Inch Halon Valve

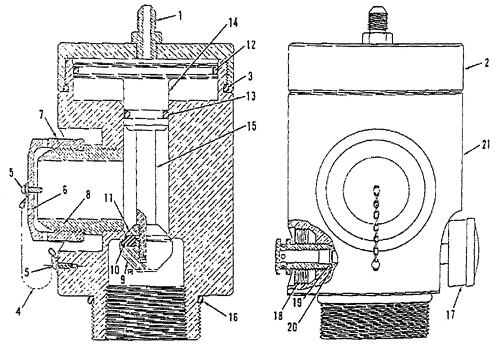
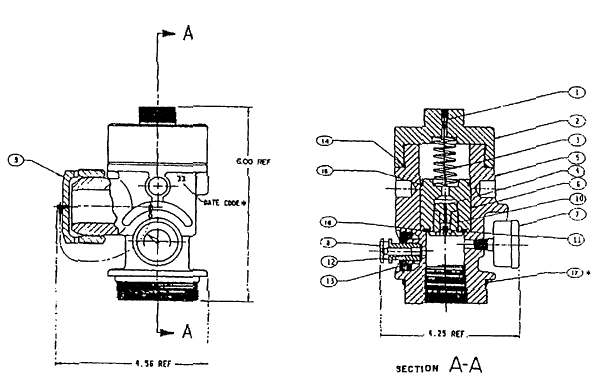
Figure 7-28 Valve Assembly Cylinder1.11 in .. Halon 1301
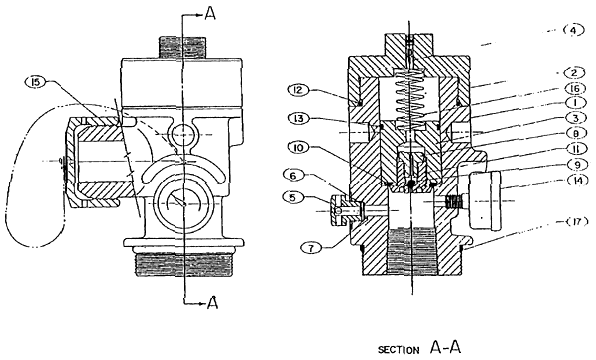
Figure 7-36 Valve Assembly Cylindor, Halon 1301


Return to Table of Contents